

How To Change Which Heroku App I Want To Fetch Logs For
Platforms like Heroku give you the freedom to focus on building great applications rather than getting lost setting up and maintaining infrastructure. One of the many great features of working with it is the Heroku logs that enable monitoring your stack error troubleshooting. It helps speed up the process when things go wrong.
In this Heroku tutorial, we'll uncover best practices for making the most of Heroku logs. Let's begin with a survey of Heroku's basic anatomy to provide a clear understanding of the terms and mechanics of Heroku's logging functionality. Feel free to skip to the logging part if you're already familiar.
Heroku Logs Cheat Sheet
Here's a summary of CLI commands that are relevant for Heroku logging for your reference.
| Command | Description |
heroku logs -t heroku logs -s app heroku logs -tp router | –tail real-time log stream –source only on app logs -tp router log entries only |
$ heroku logs -n 200 | num specify the number of log entries to display. |
$ heroku logs --d router | –dyno add filter to specify source, here, |
$ heroku logs --source app | –source specify which log source, in this example, APP logs. |
heroku drains --json | Obtain tokens for add-on log apps |
heroku releases | List all releases Info on a version Rollback a release |
heroku addons:add heroku-coralogix | Add a log analytics add-on |
Heroku Basic Architecture
Applications deployed on Heroku live in lightweight Linux containers called Dynos. Dynos can range from holding simple web apps to complex enterprise systems. The scalability of these containers, both vertically and horizontally, is one of the flexible aspects of Heroku that developers leverage. They include the following types:
- Web Dynos are web processes that receive HTTP traffic from routers. (We will demonstrate a Web Dyno in the "Hands On" Python app sample we create later in this resource.)
- Worker Dynos may be any non-web-type process type that is used for background processes, queueing, and cron jobs.
- One-off dynos are ad-hoc or temporary dynos which can run as either attached or detached from local machines. One-off Dynos are typically used for DB migrations, console sessions, background jobs, and various other administrative tasks, such as processes started by the Heroku Scheduler.
Heroku Logging Basics
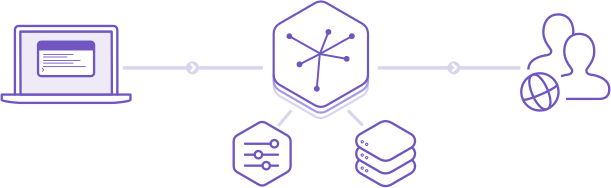
Most PaaS systems provide some form of logging. However, Heroku provides some unique features which set it apart. One such unique feature is the Logplex tool which collects, routes, and collates all log streams from all running processes into a single channel that can be directly observed. Logs can be sent through a Drain to a third-party logging add-on which specializes in log analytics.
For developers, one of the most important tools in Heroku is the command-line interface (CLI). After Heroku is installed locally, developers use the CLI to do everything including defining Heroku logs, filters, targets, and querying logs. We will explore the Heroku logging CLI in detail throughout this resource.
Heroku View Logs
The most commonly used CLI command to retrieve logs is:
$ heroku logs
Let's look at the anatomy of an Heroku log. First, enter the following CLI command to display 200 logs:
$ heroku logs -n 200
Heroku would show 100 lines by default without the -n parameter above. Using the -n, or –num parameter, we can display up to 1500 lines from the log. Here is an example of a typical log entry:
2020-01-02T15:13:02.723498+00:01 heroku[router]: at=info method=GET path="/posts" host=myapp.herokuapp.com" fwd="178.68.87.34" dyno=web.1 connect=1ms service=18ms status=200 bytes=975
2010-09-16T15:13:47.893472+00:00 app[worker.3]: 2 jobs processed at 16.6761 j/s, 0 failed ...
In the above entry, we can see the following information:
- Timestamp – The precise time when the Dyno generated the log entry, according to the standard RFC5424 format. The Default timezone is UTC (see below for how to change the default timezone).
- Source – web dynos, background workers, and crons generate log entries shown as app. HTTP routers and dyno managers are shown as
heroku. - Dyno – In this example,
worker #3is the Dyno, and the Heroku HTTP router is shown asrouter. - Message – contains the content, in this case, the
statuswhich is equal to 200, and the byte length. In practice, the message contents typically require smart analytics apps to assist with interpretation
View Heroku Logs for a Specific Dyno
The filter is another important CLI parameter. For example, by using the following filter we can choose to display only the log entries originating from a specific Dyno:
$ heroku logs --dyno
View Heroku App Logs
$ heroku logs --source app
View Heroku API Logs
$ heroku logs --source app --dyno API
View Heroku System Logs
$ heroku logs --source heroku
Heroku Log Timezone
Heroku uses the UTC timezone for its logs by default. You can change it, although the recommended approach is to convert to the client's local timezone when displaying the data, for example with a library like Luxon.
To check the current timezone:
$ heroku config:get TZ
To change the timezone for Heroku logs:
$ heroku config:add TZ="America/New_York"
Here's a full list of supported timezone formats
Log Severity Levels
To help monitor and troubleshoot errors with Heroku faster, let's get familiar with Heroku log levels.
Log data can be quantified by level of urgency. Here is the standard set of levels used in Heroku logs with examples of events for which Heroku Logplex generates a log entry:
| Severity | Description | Example |
| emergency | system is unusable | "Child cannot open lock file. Exiting" |
| alert | Immediate action required | "getpwuid: couldn't determine user name from uid" |
| critical | Threats to app functionality | "socket: Failed to get a socket, exiting child" |
| error | Client not receiving adequate service | "Premature end of script headers" |
| warning | issues which don't threaten app functioning but may need observation | "child process 01 did not exit, sending another SIGHUP" |
| notice | Normal events which may need monitoring | "httpd: caught SIGBUS, attempting to dump core in …" |
| info | Informational | "Server is busy…" |
| debug | Logs normal events for debugging | "opening config file …" |
| trace 1-8 | For finding functions in code, locating code chunks | "proxy: FTP: … " |
Types of Heroku Logs
The Heroku platform maintains four categories of logs. For example, log entries generated by a dependency-related error thrown when running an app are separated from messages about the deployment of new code. Here are summaries of the four Heroku log categories:
- App logs – Entries generated when an app runs and throws an exception, for example, for a missing dependency such as an inaccessible library.
The CLI log filter is--source app. - API logs – Developer administrative actions (such as deploying new code) trigger entries to the API log. Scaling processes and toggling maintenance mode are other examples in this category. These logs can be used to set progressive delays in retrying an API call when one fails. API logs can also be used to catch authentication failures, and issues with push requests.
The CLI filter is--source app --dyno api - System logs – Contain information about hardware system and system processes, or in other words, infrastructure. When the Heroku platform restarts an app because of an infrastructure issue, (e.g. failed HTTP request), a system log entry will be generated. The CLI filter to query system log entries is
--source heroku - Add-on logs – Add-on logs are generated by add-ons to the Heroku platform, like Redis Cloud, MongoDB, SendGrid, MemCachier, etc generate their own logs.
Heroku Build Logs
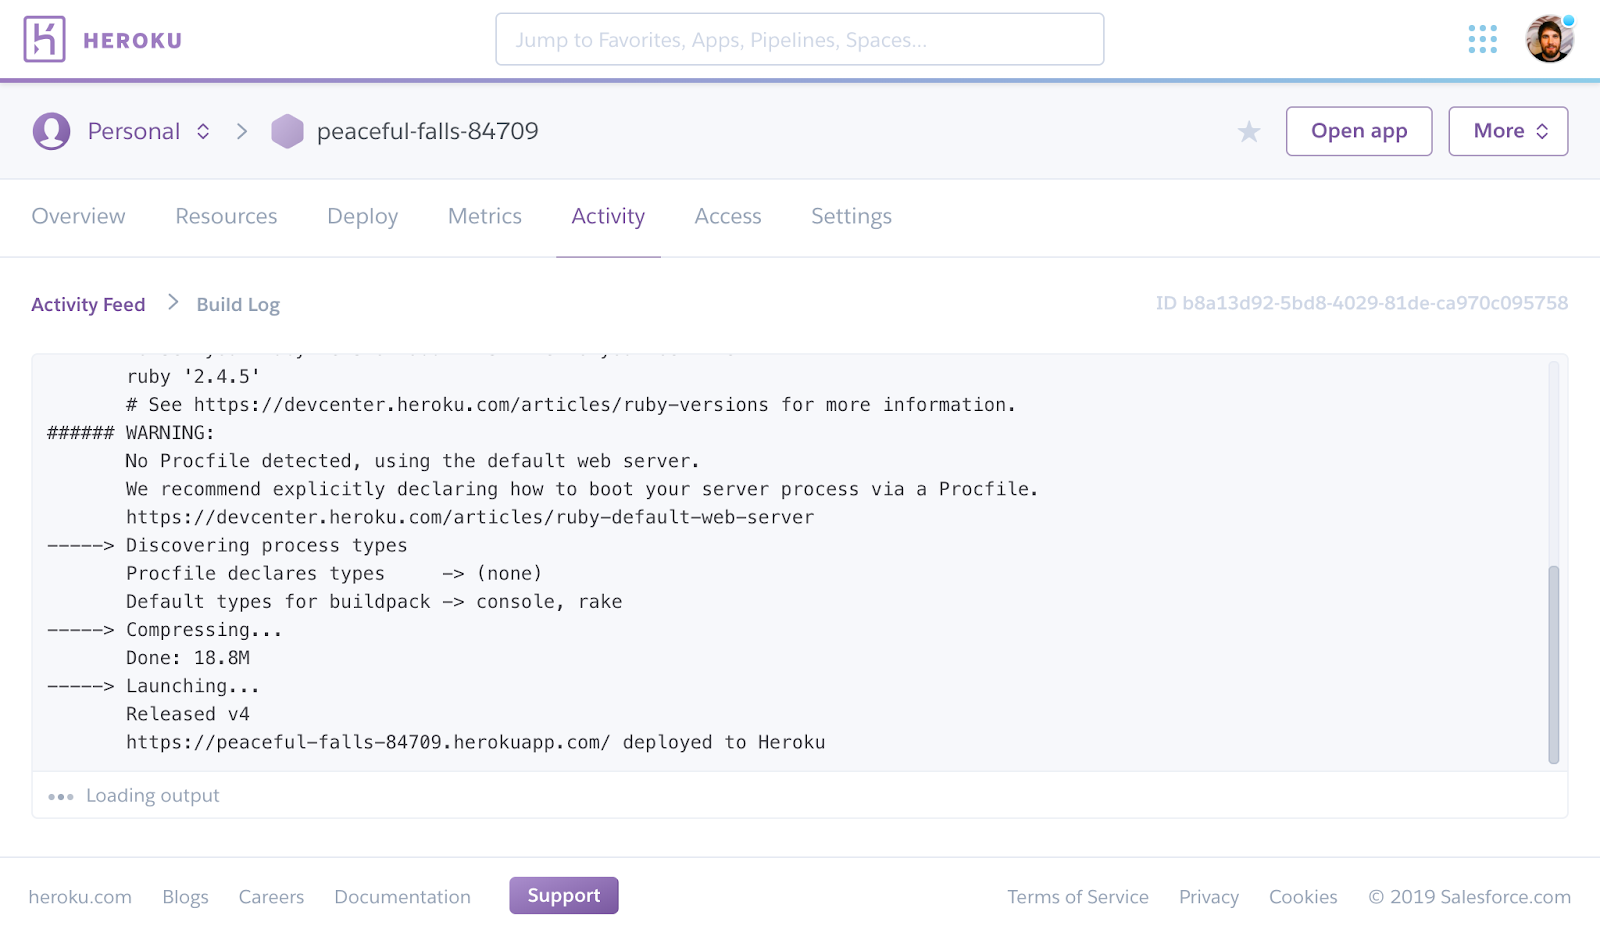
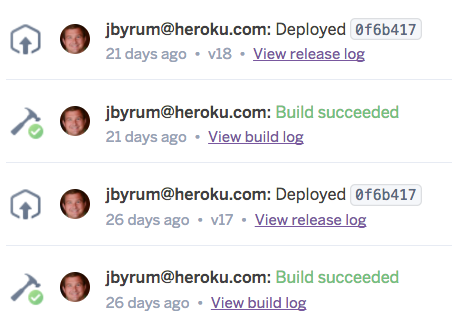
Heroku build logs are a special log type contained in the file build.logs, and generated by both successful and failed builds. These logs are accessed in your app's activity feed on the Heroku dashboard, or the build logs can be configured with a tool like Coralogix to benchmark errors for each build version. On the dashboard, click "View build log" to see build-related events in the activity feed.
A running app can also write an entry directly to a log. Each coding language will have its own method for writing to Heroku logs. For example, see the Heroku Log Tips and Traps for Ruby further along in this article. Log entries do not live forever, and as we will see later on, the time retention of log entries is determined by log type. This aspect of logging is best managed through the use of a log analytics app which is machine learning (ML-capable).
Heroku Release Logs
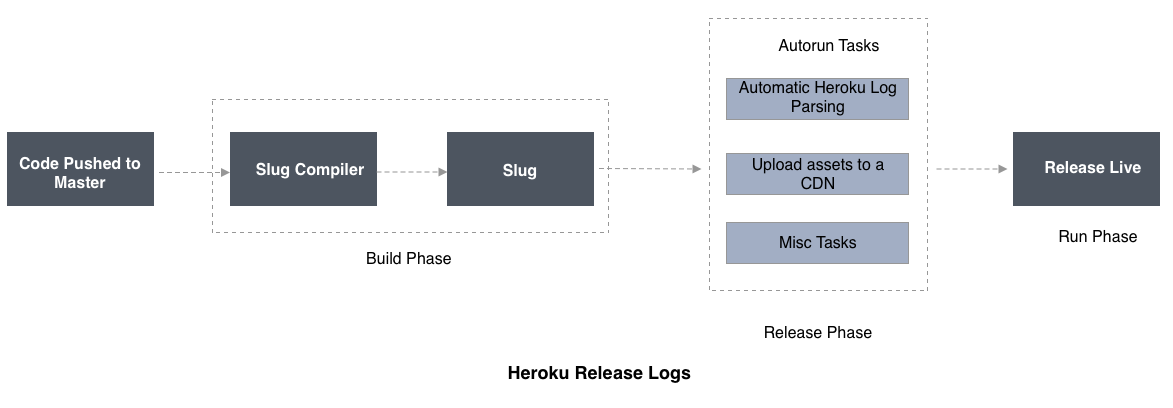
Release logs show the status of each release of an app. This includes failed releases that are pending because of a release command which has not returned a status yet. In the following release log entry, version 45 of an app deployment failed:
v45 Deploy ada5527 release command failed
Use "curl" to programmatically check the status of a release. Curl the Platform API for specific releases or to list all releases. Release output can also be retrieved programmatically by making a GET request on the URL. The output is available under the output_stream_url attribute.
Heroku Router Logs
Router logs contain entries about HTTP routing in Heroku's Common Runtime. These represent the entry and exit points for web apps and services running in Heroku Dynos. The runtime manages dynos in a multi-tenant network. Dynos in this network receives connections from the routing layer only.
A typical Heroku router log entry looks like this:
2020-08-19T05:24:01.621068+00:00 heroku[router]: at=info method=GET path="/db" host=quiescent-seacaves-75347.herokuapp.com request_id=777528e0-621c-4b6e-8eef-74caa34c1713 fwd="104.163.156.140" dyno=web.1 connect=0ms service=19ms status=301 bytes=786 protocol=https
In the example above, following the timestamp, we see a message beginning with one of the following log levels: at=info, at=warning, or at=error. After the warning level the entry contains additional fields from the following table which describe the issue being logged:
| Field | Description |
| Heroku error "code" (Optional) | Error codes which supplement HTTP status codes |
| Error "desc" (Optional) | Description of the error corresponding to the codes above |
| HTTP request "method" e.g. GET or POST | A variety of issues |
| HTTP request "path" | URL originating the request |
| HTTP request "host" | Host header value |
| Heroku HTTP Request ID | Correlates router logs to app logs |
| HTTP request "fwd" | X-Forwarded-For header value |
| Which "dyno" serviced the request | Troubleshooting specific containers |
| "Connect" time (ms) | Establishing a connection to the webserver |
| "Service" time (ms) | Proxying data between the client and the webserver |
| HTTP response code or "status" | Issues discovery |
| Byte count | Size in bytes, current request |
Events which trigger log entries
Ideally, an Heroku log should contain an entry for every useful event in the behavior of an application. When an app is deployed and while it is running in production, there are the many types of events which trigger log entries:
- Authentication , Authorization, and Access: These events include things such as successful and failed authentication and authorizations, system access, data access, and application access.
- Changes: These events include changes to systems or applications, changes to data (creation and destruction), application installation, and changes.
- Availability: Availability events include startup and shutdown of systems and applications, builds and releases, faults and errors that affect application availability, and backup successes and failures.
- Resources: Resource issues to log include exhausted resources, exceeded capacities, and connectivity issues.
- Threats: Some common threats to logs include invalid inputs and security issues known to affect the application.
Log Retention Period
The retention period length we set is important because log data can quickly get out of control. Retaining unnecessary log data can add overhead to analysis, however, discarding log data too early may reduce the opportunity for insights. One useful way of determining which logs should be kept and for how long can be defined by ensuring we have accurately established the correct Heroku log levels, and by establishing different retention periods based on specific criteria like the log level, system, and subsystem. This can be accomplished programmatically by yourself or with a 3rd-party tool like the Coralogix usage optimizer.
Managing Sensitive Log Data
Investigation of recent security breaches at giant eCommerce enterprises like Uber and Aeroflot surprisingly revealed that the source of the web app's vulnerability lay inpoorly configured and inadequately monitored log streams.
Many recent cases involving customer credit card loss and proprietary source code exposure occurred because developers were unaware that their log streams contained OAuth credentials, API secret keys, authentication tokens, and a variety of other confidential data. Cloud platforms generate logs with default output containing authentication credentials, and log files may not be adequately secured. In many recent security breaches, unauthorized users gained access by way of reading log entries which contained authentication credentials.
Obscuring sensitive data should be done prior to shipping logs, but some tools like the Coralogix parser are capable of removing specific data from logs after the logs have been shipped.
Log Runtime Metric Logs
To monitor load and memory usage for apps running in Dynos, Heroku Labs offers a feature called "log-runtime-metrics." The CLI command $ heroku logs --tail can be used to view statistics about memory and swap use, as well as load averages, all of which flow into the app's log stream.
Example runtime metric logs:
source=web.1 dyno=heroku.2808254.d97d0ea7-cf3d-411b-b453-d2943a50b456 sample#memory_total=21.00MB sample#memory_rss=21.22MB sample#memory_cache=0.00MB sample#memory_swap=0.00MB sample#memory_pgpgin=348836pages sample#memory_pgpgout=343403pages
Learn more about how to use runtime metrics in the documentation here.
Heroku Log Drains: Centralizing Log Data
In order to understand Drains in Heroku logs, we will first need to clarify how Heroku Logplex works. Logplex aggregates log data from all sources in Heroku (including dynos, routers, and runtimes) and routes the log data to predefined endpoints. Logplex receives Syslog messages from TCP and HTTPS streams from a node in a cluster, after which log entries are sent to Redis buffers (the most recent 1,500 log entries are retained by default). For example, Heroku then distributes the logs to display with $ heroku logs --tail, or for our purposes, to forward the logs to Drains.
A Heroku Drain is a buffer on each Logplex node. A Drain collects log data from a Logplex node and then forwards it to user-defined endpoints. For our purposes, Heroku Drains connect to 3rd party log analytics apps for intelligent monitoring of log data.
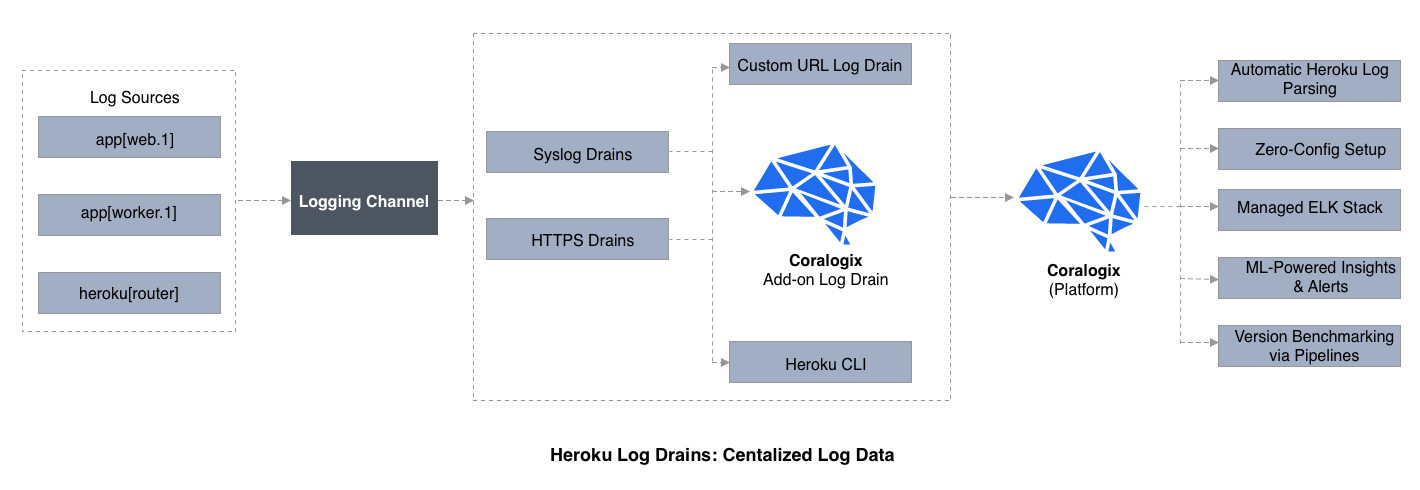
Two Types of Heroku Log Drains
The two types of Heroku Drains provide log output to different endpoints. The two Drain types include:
- Syslog Drains – forward Heroku logs to an external Syslog server
- HTTPS Drains – write original log-processing code to forward to a web service
How to set up an Heroku Log Drain
Logplex facilitates collecting logs from apps for forwarding to log archives, to search and query, and also to log analytics add-on apps. To manage how application logs are processed, we can add Drains of the two types mentioned earlier: Syslog drains, and HTTPS drains.
1 – Install a log analytics app, preferably one with machine learning analytics capability, and obtain the authorization token to access that app.
2 – Configure a Syslog or HTTPS Heroku Log Drain to send data from an app running in a Heroku Dyno to the Add-on analytics app (appName).
Here is the CLI command to start a TLS Syslog drain:
$ heroku drains:add syslog+tls://logs.this-example.com:012 -a appName
And for the same appName, here is the plain text Syslog drain:
$ heroku drains:add syslog://logs.this-example.com -a appName
To configure an HTTPS drain, use:
$ heroku drains:add https://user:pass@thislogdrain.app.com/logs -a appName
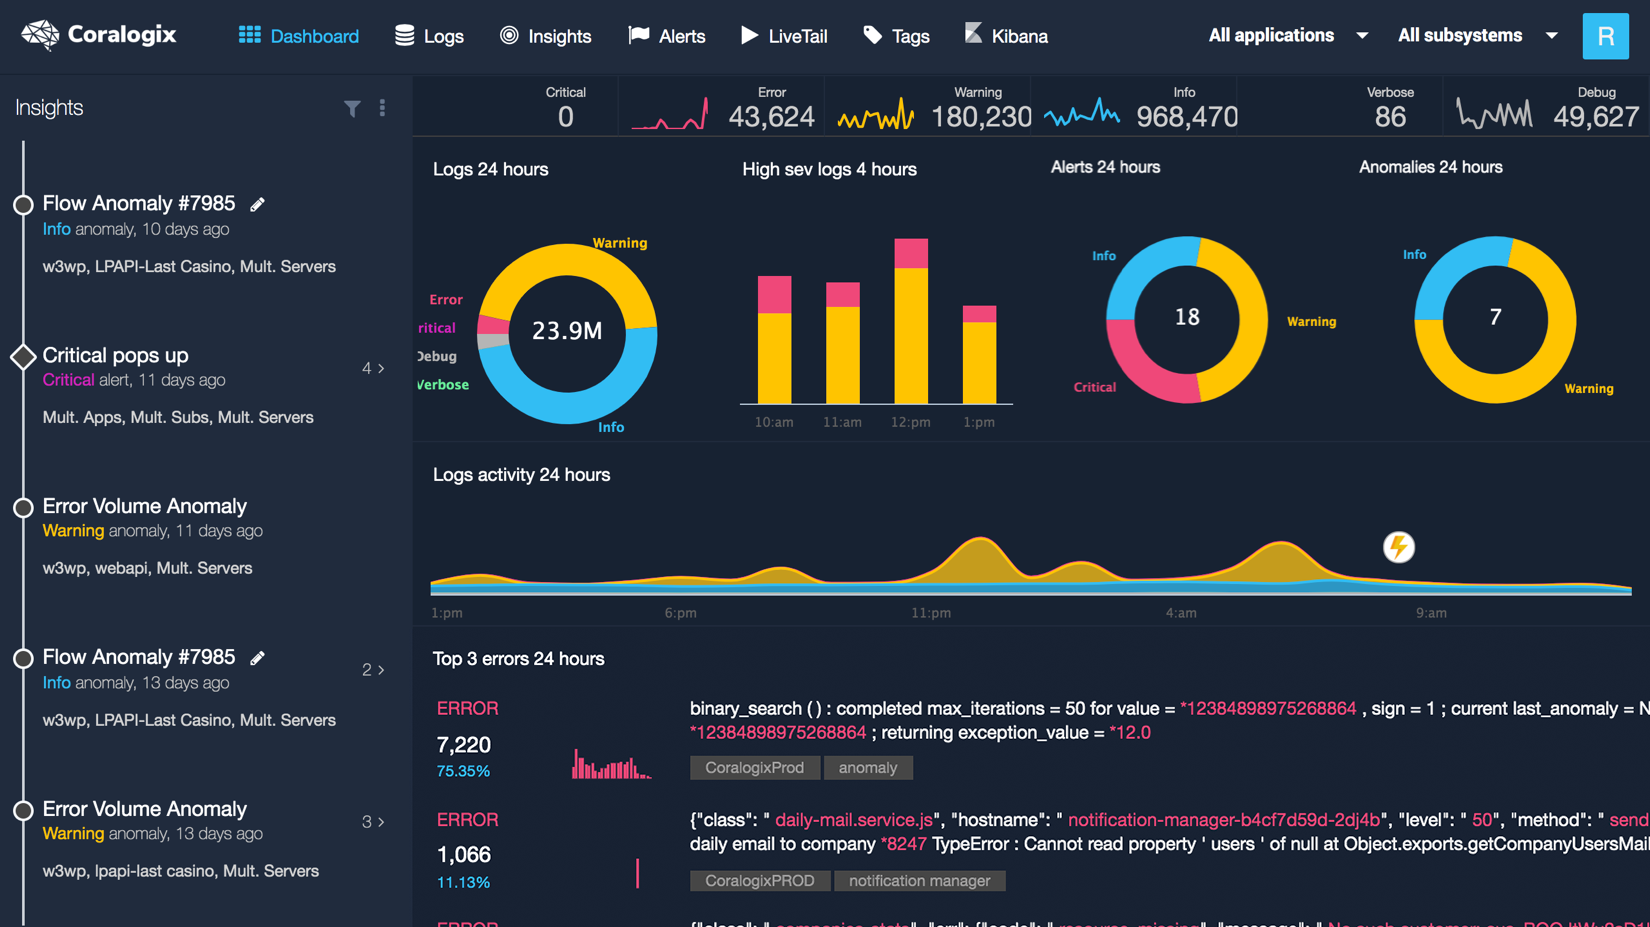
3 – Monitor the performance of the app running in the Dyno with the dashboard of visualizations provided by the add-on analytics app. Here is what it looks like while monitoring the live tail of an app with Coralogix Add-on:
Heroku Tail Logs
The Heroku logs –tail option is the real-time tail parameter. Its purpose is to display current log entries while keeping the session alive for additional entries to stream while the app continues to run in production. This is useful for testing live apps in their working environments. There are several subtle points to real-time log monitoring. Let's look at some of the fundamentals before we tackle the actual usage of the log –tail.
Heroku handles logs as time-ordered event streams. If an app is spread across more than one Dyno, then the full log is not contained in *.log files, because each log file only contains a view per container. Because of this, all log files must be aggregated to create a complete log for analysis.
Moreover, Heroku's filesystem is temporary. Whenever a Dyno restarts all prior logs are lost. Running Heroku console or "run bash" on Cedar Stack does not connect a running Dyno, but instead creates a new one for this bash command, which is why this is called a "one-off process." So, the log files from other Dynos don't include the HTTP processes for this newly created Dyno.
With this in mind, to view a real-time stream from a running app for example, use the -t (tail) parameter:
$ heroku logs -t
2020-06-16T15:13:46-07:00 app[web.1]: Processing PostController1#list (for 208.39.138.12 at 2010-09-16 15:13:46) [GET] 2020-09-16T15:13:20-07:00 app[web.1]: Rendering template layouts/application 2020-06-16T15:13:46-07:00 heroku[router]: GET myapp.heroku.com/posts queue=0 wait=1ms service=2ms bytes=1975 2020-06-16T15:13:47-07:00 app[worker.12]: 23 jobs processed at 16.6761 j/s, 0 failed ...
In the above log entry, we are observing the behavior or a running app. This is useful for live monitoring. To store the logs for longer periods, and for triggers, alerts, and analysis, we can create a drain to an add-on log analytics app like Coralogix.
Heroku logging with specific languages
Each language has its own built-in logging functionality which can write to Heroku logs. Third-party logging apps are specifically designed to extend built-in logging functions and to compensate for inadequacies.
Ruby was the original language supported by Heroku. As a result, many of the well-known developer shortcuts for making best use of Heroku logs arose from developing and deploying Ruby apps. For example, it's possible for a running app to write entries to logs. In Ruby, this is done with puts:
puts "User clicked twice before callback result, logs!"
The same log entry would be written with Java like this:
System.out.println("User clicked twice before callback result"); In the following sections, we'll explore tips for working with popular programming languages and Heroku.
Heroku Logging with Ruby
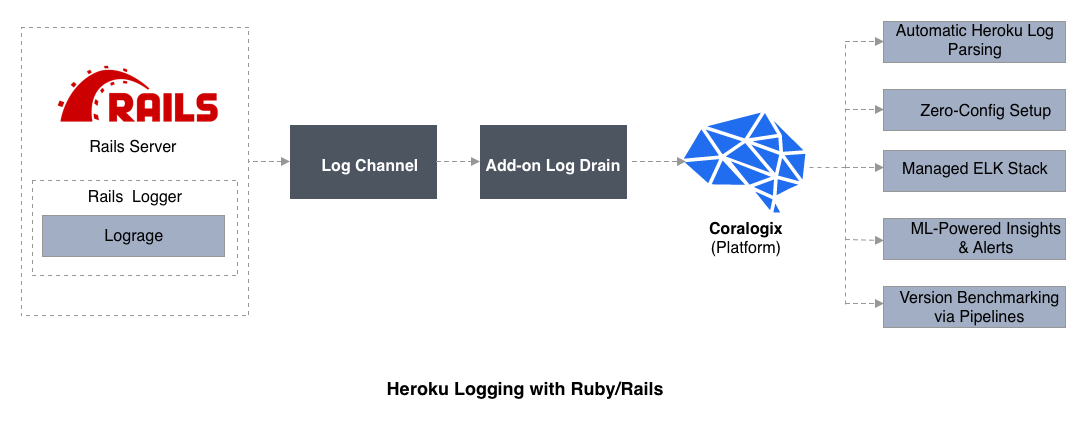
Ruby / Rails was the first coding language supported by Heroku, and Rails works without trouble. Nevertheless there are measures which further optimize Rails app logging with Heroku. Here are several tips which may not be obvious to developers who are just beginning to deploy Rails to Heroku.
- Configure a Rails apps to connect to Postgres
- Configure logs to stream to STDOUT.
- Enable serving assets for the app in production.
Writing to STDOUT
Heroku logs are data streams which flow to STDOUT in Rails. To enable STDOUT logging, add the rails_12factor gem. This measure will configure the application to serve assets while in production. Add this to the Gemfile:
gem 'rails_12factor', group: :production
In order to write logs from code, as mentioned earlier, use the following command:
puts "User clicked twice before callback result, logs!"
This will send the log entry to STDOUT. Omission of this configuration step will result in a warning when deploying the app, and assets and logs will not function.
Ruby Logging Libraries
- Lograge for Rails offers sophisticated log interpreting functions for Rails including request and URL endpoints for GET, POST, or PUT.
- Request status: the HTTP status codes generated for a completed request and their elapsed response time.
- Controller and action: a function to send a request from the application router
- Templates and partials: generate log entries about files required to create web page views for a URL endpoint
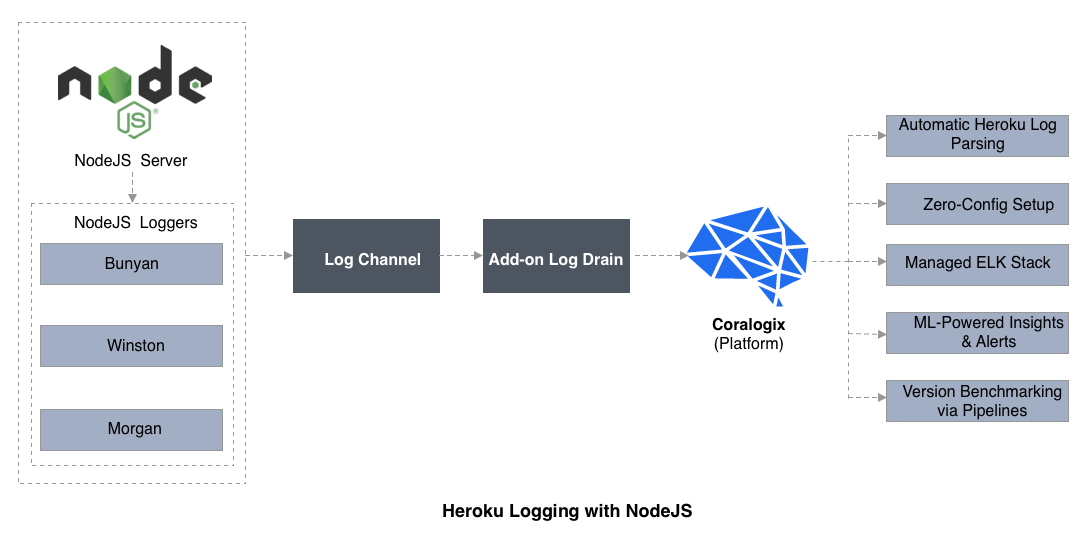
Heroku Logging with Node.js
Important log attributes to define before testing a Node.js service on Heroku include:
- Event timestamps
- Log format readable to human and machine
- Log path to standard output files
- Log priority levels to dynamically select log output
The following are common issues and tips for logging with Heroku and Node.js.
Mismatched Node Versions
A commonly overlooked mistake when deploying Node.js on Heroku can occur from mismatched Node versions. This issue will appear in the Heroku build log. The Node.js version in the production environment should match that of the development environment. Here is the Heroku CLI command to verify local versions:
$ node --version
$ npm --version
We can compare the results with package.json engines version by looking at the Heroku Build Log, which will look like this:

If the versions don't match, be sure to specify the correct version in package.json. In this way you can use Heroku Logs to identify build issues when deploying Node.js apps.
Async
Async and callbacks are central to the functionality of Node.js apps. When deploying complex apps, we need tools that go beyond console.log. One obscure detail is that when the Heroku log destination is a local device or file, the console acts synchronously. This prevents messages from getting lost when an app terminates unexpectedly. However, the console acts asynchronously when the log channel is a pipe. This prevents a problem when a callback results in long period blocking.
Node.js Logging Libraries
Many developers will naturally gravitate toward an async logging library like Winston, Morgan, or Bunyan. The quintessential feature of Winston is its support for multiple transports which can be configured at various logging levels. However, problems with Winston include a lack of important details in its default log formatting. An example of missing details is log entry timestamps. Timestamps must be added via config. The lack of machine names and process IDs make it difficult to apply the next layer of third party smart log analytics apps. However, Heroku Add-Ons like Coralogix can easily work with Winston and Bunyan.
Heroku Logging with Python
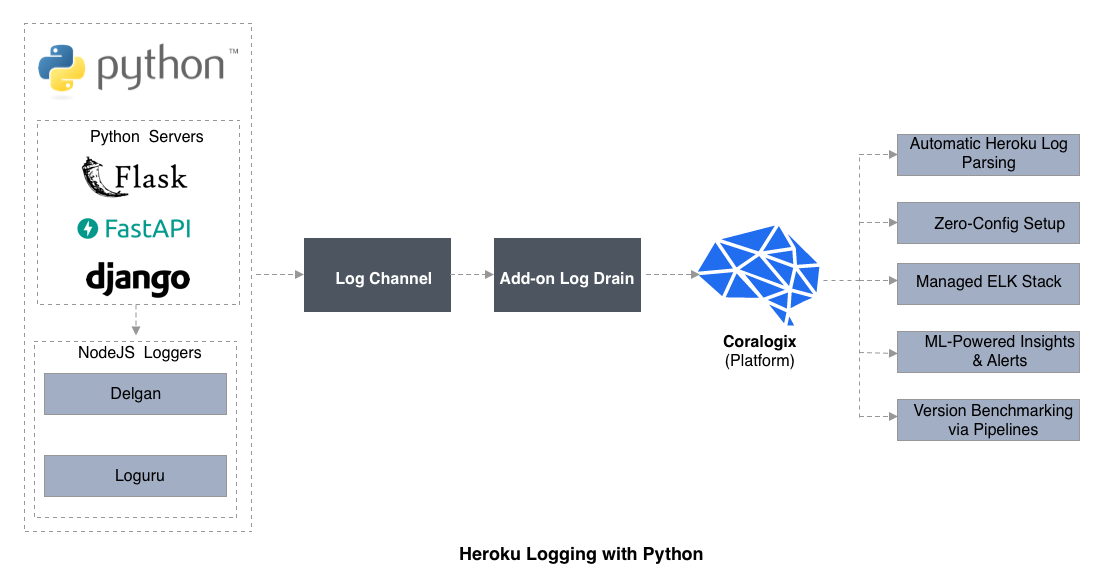
When deploying a Python web app, testing and debugging can be frustrating if log entries are difficult to interpret. Using print() and sys.stdout.write() may not generate meaningful log entries when deploying to the Cloud and using the CLI command $ heroku logs to display log entries. Moreover, it is challenging to debug Python runtime errors and exceptions, because the origin of the HTTP request error may not be apparent. So, how can we write log entries from Python to resolve this issue?
The underlying source of this general problem is that while stdout is buffered, stderr is not buffered. One solution is to add sys.stdout.flush() following print statements. Another tip to ensure the HTTP error origin is captured in the log is to verify that the right IP/PORT is monitored. If so, HTTP access entries from GET and index.html should appear in the Heroku log.
Configuring a web framework to run in debug mode will make log entries verbose. Stacktraces should display in the browser's developer console. The setting in Flask to achieve this outcome is:
app.config['DEBUG'] = True or app.run( ….. , debug=True)
Finally, when configuring a procfile to initiate the python CLI, use the '-u' option to avoid stdout buffering in the following way:
python -u script.py
If using Django, use:
import sys print ("hello complicated world!") sys.stdout.flush() As mentioned earlier, the Python logging library itself is the standard for Python coding, as opposed to other third party offerings. The Python developer community provides limitless blogs on trips and traps of Python logging with Heroku.
Logging Libraries for Python
The built-in Python logging functionality is the standard, while third party offerings from Delgan and Loguru are really intended to simplify the use of built-in Python logging.
Here is a logging example with Python using loguru library. Loguru uses the global "anonymous" logger object. Import loguru as shown in the code sample below. Then,
use bind() with a name to identify log entries originating from a specific logger in this way:
from loguru import logger def sink(message): record = message.record if record.get("name") == "your_specific_logger": print("Log comes from your specific logger") logger = logger.bind(name="your_specific_logger") logger.info("An entry to write out to the log.") Heroku Logging with Golang

Go's built-in logging library is called "log," and it writes to stderr by default. For simple error logging, this is the easiest option. Here's a division by zero error entry from the built-in "log":
2020/03/28 11:48:00 can't divide by zero
Each programming language supported by Heroku contains nuances, and Golang is no exception. When logging with Golang, in order to avoid a major pitfall while sending log output from a Golang application to Heroku runtime logs, we must be clear about the difference between fmt.Errorf and fmt.Printf.
Writing to standard out stdout and standard error stderr in Go sends an entry to the log, but fmt.Errorf returns an error instead of writing to standard out, whereas fmt.Printf writes to standard out. Be aware also that Go's built-in log package functions write to stdout by default, but that Golang's log functions add info such as filenames and timestamps.
Logging Libraries for Golang
The built-in Golang logging library is called "log." It includes a default logger that writes to standard error. By default, it adds the timestamp. The built-in logger may suffice for quick debugging when rich logs are not required. The "Hello world" of logging is a division by zero error, and this is the realm of Golang's built-in logger. For more sophisticated logging there are:
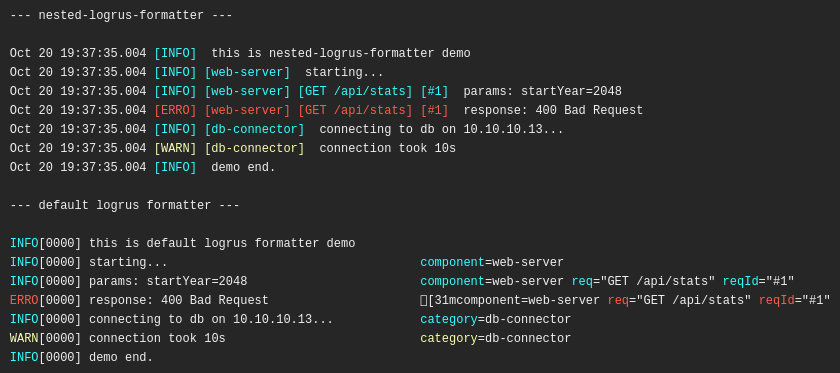
logrus is a library that writes log entries as JSON automatically and inserts typical fields, plus custom fields defined by configuration. See more at Logrus.
glog is specially designed for managing high volume logs with flags for limiting volume to configured issues and events. See more at glog.
To explore Golang tracing, OpenTracing is a library for building a monitoring platform to perform distributed tracing for Golang applications.
Heroku Logging with Java

Let's look at an example app using a REST API with JAX-RS. The purpose of this example is to demonstrate how to write log entries that identify which client request generated the log entry. We accomplish this by using MDCFilter.java and import MDC with:
import org.slf4j.MDC;
And here is an example use:
@Diagnostic public class MDCFilter implements ContainerRequestFilter, ContainerResponseFilter { private static zfinal String CLIENT_ID = "client-id"; @Context protected HttpServletRequest r; @Override public void filter(ContainerRequestContext req) throws IOException { Optional clientId = Optional.fromNullable(r.getHeader("X-Forwarded-For")); MDC.put(CLIENT_ID, clientId.or(defaultClientId())); } @Override public void filter(ContainerRequestContext req, ContainerResponseContext resp) throws IOException { MDC.remove(CLIENT_ID); } private String defaultClientId() { return "Direct:" + r.getRemoteAddr(); } } As we will discuss log4J in our section on Java logging libraries, here is a conversion pattern:
log4j.appender.stdout.layout.ConversionPattern= %d{yyyy-dd-mm HH:mm:ss} %-5p %c{1}:%L - %X{client-id001} %m%n Java Logging Libraries
SLF4J is not actually a library for Java logging, but instead implements other Java logging libraries at deployment time. The "F" in the name is for "Facade," the implication being that SLF4J makes it easy to import a library of choice at deployment time. Log4J is one such Java logging library. Below are some interesting capabilities of log4J.
- Set logging behavior at runtime
- Change log format by extending the class Layout
- Thread-safe log implementation
- Appender interface exposes target of log output
- Capability to import and use other logging facilities
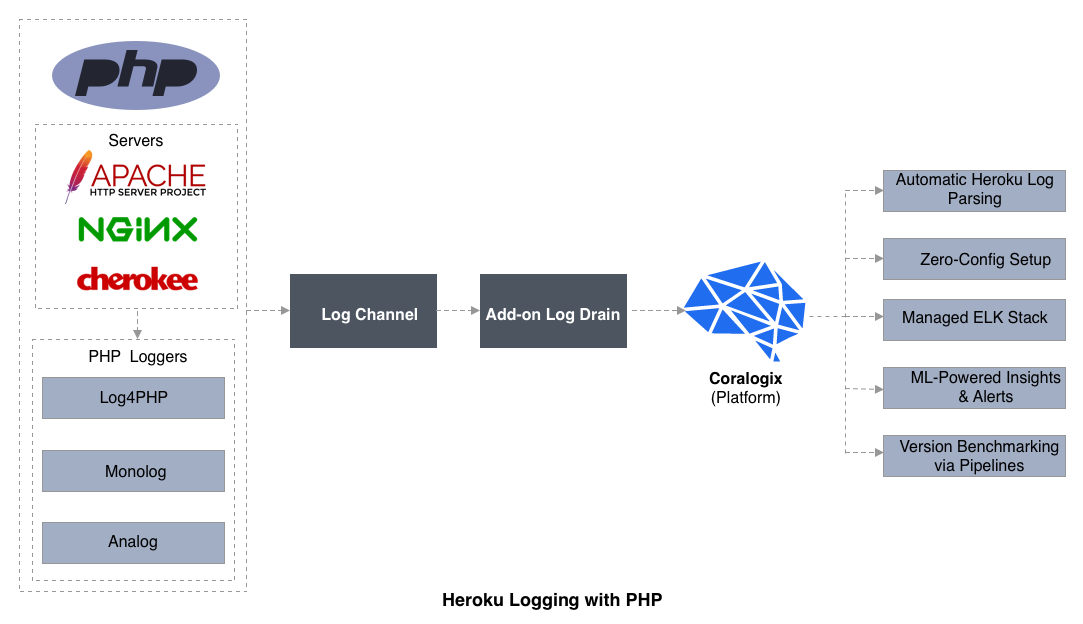
Heroku Logging with PHP
PHP writes and routes log entries in a variety of ways which depend on the configuration of err_log in the php.ini file. To write log output to a file, name the file in err_log. To send the log output to Syslog, simply set err_log to Syslog, so that log output will go to OS logger. In Linux, the newer Rsylog uses the Syslog protocol, while on Windows it is the Event Log. The default behavior, in the event that err_log is not set, is the creation of logs with the Server API (SAPI). The SAPI will depend on which PaaS is implemented. For example, a LAMP platform will use the Apache SAPI and log output will stream to Apache error logs. This example php.ini will include the maximum log output to file:
; Log all errors Error_reporting = E_ALL ; Don't display any errors in the browser display_errors = 0ff ; Write all logs to this file: error_log = my_file.log
Logging Libraries for PHP
Although the popular frameworks for PHP like Laravel and Symfony have logging solutions built-in, there are several logging libraries that are noteworthy. Each has a set of advantages and disadvantages. Let's have a look at the important ones:
- Log4PHP is an Apache Foundation library for PHP logging. It features functionality including logging to multiple destinations and log formatting. With the configuration file multiple handlers can be set up. These are called "appenders." The only disadvantage is that Log4PHP isn't PSR-3 compliant. Another disadvantage is that it does not support namespacing for classes, so it's difficult to integrate into large apps.
- Monolog is a PSR-3 compliant logging library for PHP. With integration components for most popular frameworks including Symfony and Laravel, Monolog is the most comprehensive logging solution for PHP. Monolog supports logging to target handlers for browser console, database, and messaging apps like Slack. And Monolog also integrates with log analytics apps like Coralogix and Loggly.
- Analog library is a simplistic logging solution compared to Monolog and does not have features like log formatters. Log handlers for email, database, and files are configured via static access to the Analog class of objects.
Heroku Logging with Scala
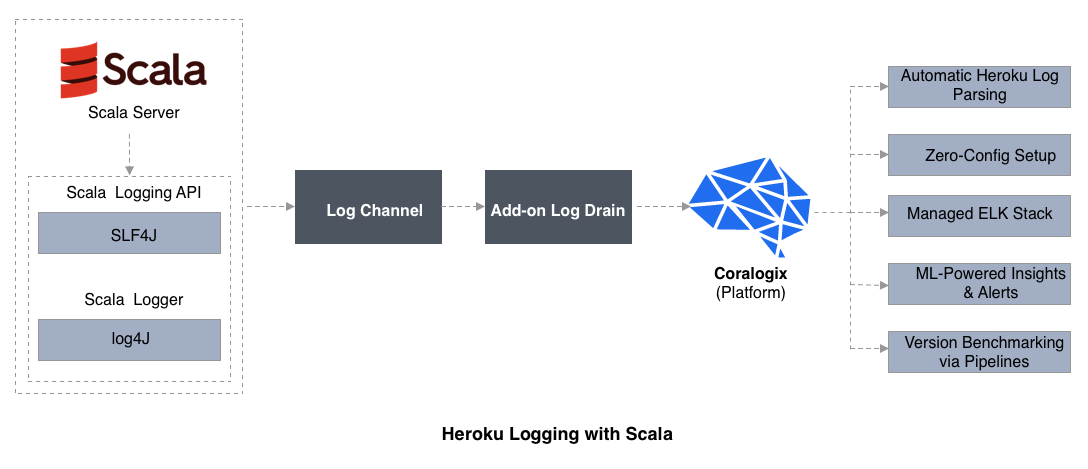
Scala-logging is essentially SLF4J for Java, but wrapped for use with Scala. In fact, SLF4J will run on a variety of logging frameworks including log4j which adds SLF4J to our application dependencies.
1) The first step to use SLF4J with Scala is to add the dependency for logging: Open build.sbt in an editor. Add scala-logging by including this:
name := "Scala-Logging-101" version := "0.1" scalaVersion := "2.12.7" libraryDependencies += "com.typesafe.scala-logging" %% "scala-logging" % "3.9.0"
2) Now, download the jar files for logback and include this in the runtime classpath.
3) Next, create a new directory in the project folder and call it "libs." Add libs to the project classpath.
4) Select "Open Module Settings" with a right-click on the project name. Now, select the "Dependencies" tab and add a new directory.
5) Select "Add jars" or directories and then IDEA will open the chooser to select the indicated folder.
6) Download logback jars and open the archive.
7) Copy logback-classic-(version).jar and logback-core-(version).jar to the libs directory.
8) Now we can run code and direct the output to an Heroku Drain.
import com.typesafe.scalalogging.Logger object Scala-Logging-101 extends App { val logger = Logger("Root") logger.info("Hello Scala Logger!") logger.debug("Hello Scala Logger!") logger.error("Hello Scala Logger!") } The output will flow through the Heroku Drain already created and look like this:
18:14:29.724 [main] INFO ROOT - Hello Scala Logger! 18:14:29.729 [main] DEBUG ROOT - Hello Scala Logger! 18:14:29.729 [main] ERROR ROOT - Hello Scala Logger!
Heroku Logging with Clojure
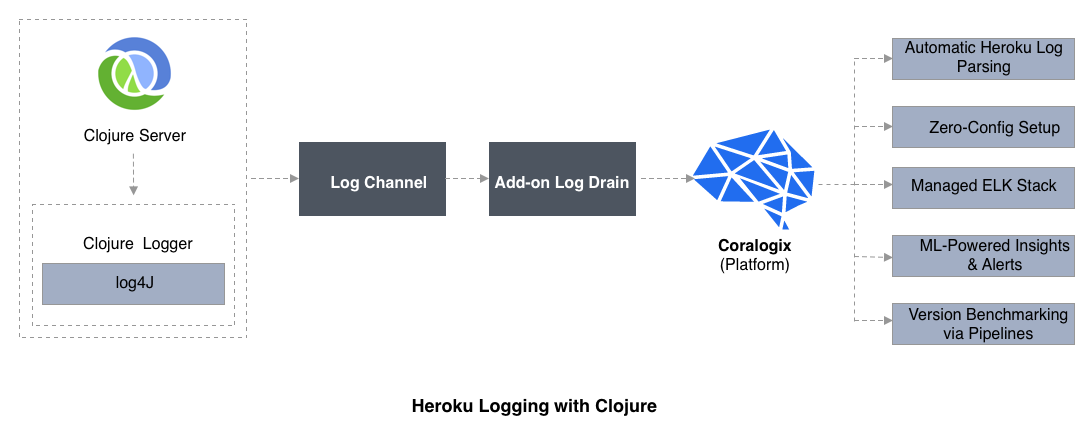
Typically, Clojure developers use Log4j when deploying apps with Heroku. As we will see in the next section on logging libraries for specific coding languages, Log4j was developed for Java, but is now used for several other languages as well.
The first step is to set up <code>clojure.tools.logging</code> and Log4j to write to Heroku logs. The <code>clojure.tools.logging</code> will write to standard output such as Heroku-style 12 Factor App and Syslog, and also as structured log files which will ultimately be translated by log analytics apps to provide alerts and performance monitoring.
To start writing to logs from Clojure, first, add <code>clojure.tools.logging</code> and <code>log4j</code> to dependencies in <code>project.clj</code> using the following:
:dependencies [[org.clojure/tools.logging "1.1.0"] [log4j/log4j "2.0.8" :exclusions [javax.mail/mail javax.jms/jms com.sun.jmdk/jmxtools com.sun.jmx/jmxri]] ;; ...code here ]
Next set up the properties file for Log4j in resources/log4j.properties like this:
log4j.rootLogger= error, stdout log4j.appender.stdout=org.apache.log4j.ConsoleAppender log4j.appender.stdout.Target=System.out log4j.appender.stdout.layout=org.apache.log4j.PatternLayout log4j.appender.stdout.layout.ConversionPattern=%p @ %l > %m%n
To test this implementation, we will run a code snippet that contains errors which will then generate anticipated log entries. Save the following code to the file src/myApp/core.clj. Create a file named "myApp" containing the following code snippet:
(ns myApp.core (:require [clojure.tools.logging :as log])) ;; Write log statements at severity levels: (log/trace "Lowest log level") (log/debug "Coder info") (log/warn "Warning") ;; Various log entries: (log/info "Performance issue happened:" {:name1 12 :name2 :que} "time out.") ;; Exceptions: (try (/ 10 (dec 1)) ;; <-- division by zero. (catch Exception e (log/error e "Division by zero."))) This will produce log entries like the following:
2020-02-20 13:18:38.933 | ERROR | nREPL-worker-2 | myApp.core | Division by zero
To remain consistent with best practices in CI/CD we should consider automating log analytics. The next natural step in deploying Clojure is to use Log4j appenders to send logs to an app such as Coralogix to provide alerts, charting, and other visualizations. For example:
log4j.appender.CORALOGIX=com.coralogix.sdk.appenders.CoralogixLog4j1Appender log4j.appender.CORALOGIX.companyId=*insert your company ID* log4j.appender.CORALOGIX.privateKey=*Insert your company private key* log4j.appender.CORALOGIX.applicationName=*Insert desired Application name* log4j.appender.CORALOGIX.subsystemName=*Insert desired Subsystem name* log4j.rootLogger=DEBUG, CORALOGIX, YOUR_LOGGER, YOUR_LOGGER2, YOUR_LOGGER3
Heroku Logging with C#
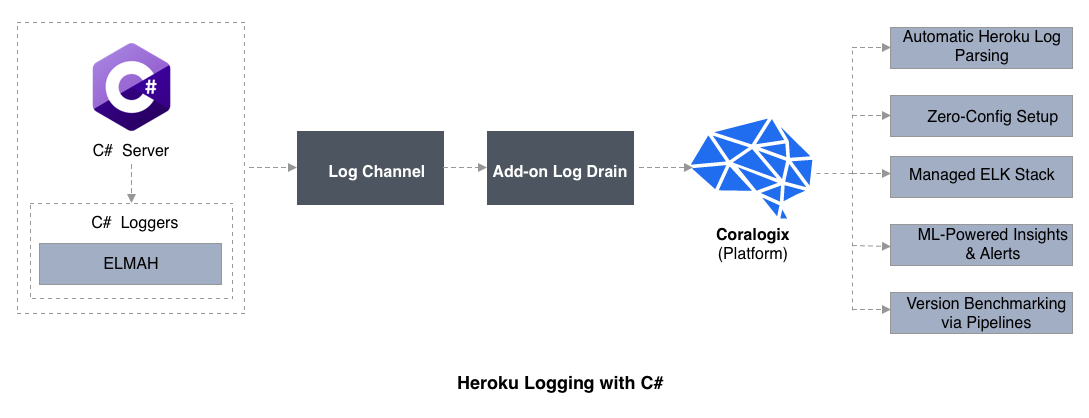
NLog and its API are easy to set up as illustrated in the example below. Reviews claim it's faster than log4net. Nlog handles structured logging of most popular databases. We can extend NLog to write logs to any destination. Here is an example to set up Nlog to send logging output to Heroku. First, configure an XML file in code like this:
var config1 = new NLog.Config.LoggingConfiguration(); var logfile1 = new NLog.Targets.FileTarget("logfile1") { FileName = "file1.txt" }; var logconsole1 = new NLog.Targets.ConsoleTarget("logconsole"); config1.AddRule(LogLevel.Info, LogLevel.Fatal, logconsole); config1.AddRule(LogLevel.Debug, LogLevel.Fatal, logfile1); NLog.LogManager.Configuration = config1; Now, add a class with a method to write to the log:
class MyClass { private static readonly NLog.Logger _log_ = NLog.LogManager.GetCurrentClassLogger(); public void Foo() { _log.Debug("Logging started"); _log.Info("Hello {Name}", "Johnathan"); } } Logging Libraries for C#
Like Log4NET, which has always been the .NET logging standard, NLog supports multiple logging targets and logs messages to many types of data stores. As for standard logging practices, both present similar features. ELMAH is a C# logging library that does offer several differences.
- ELMAH, which means "Error Logging Modules And Handlers," on the other hand, does offer features beyond the standard fare. ELMAH is an open-source library that logs runtime errors in the production environment. A distinctive component of ELMAH, beyond error filtering, is its capability to display error logs on a web page in the form of RSS feeds. Here's a screenshot of ELMAH displaying an error log as a web page:
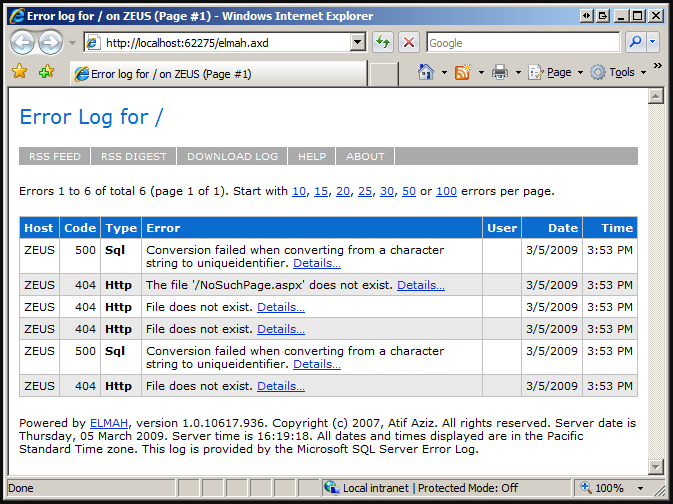
Image source
Hands-On Example: Troubleshooting Heroku
To illustrate the value and importance of Heroku logs, we will run a sample app and look at some commonly encountered issues. We will start by deploying a simple Python app and watch how Heroku logs an issue when the app runs. Later we will scale the app and introduce a more subtle bug to find out how a vast log output ultimately calls for a solution to assist developers in the task of pinpointing bugs.
Note: Be sure you have created a free Heroku account, and your language of choice is installed:
Step 1: Install Heroku locally
Step 2: Install GIT to run the Heroku CLI
Step 3: Use the Heroku CLI to login to Heroku
Step 4: Clone a GIT app locally to deploy to a Heroku Dyno
$ git clone https://github.com/heroku/python-getting-started.git $ cd python-getting-started
Step 5: Create your app on Heroku, which:
- Creates a remote GIT via Heroku and
- Associates it with your local GIT clone
- Deploy on Linux, for example with
$ git push heroku master
Step 6: Open the app in the browser with the Heroku CLI shortcut:
$ heroku open
At this point, if you're following along with Heroku's example deployment, you can see the Heroku log generated by deploying and opening the app. Let's look at the first obvious app issue:
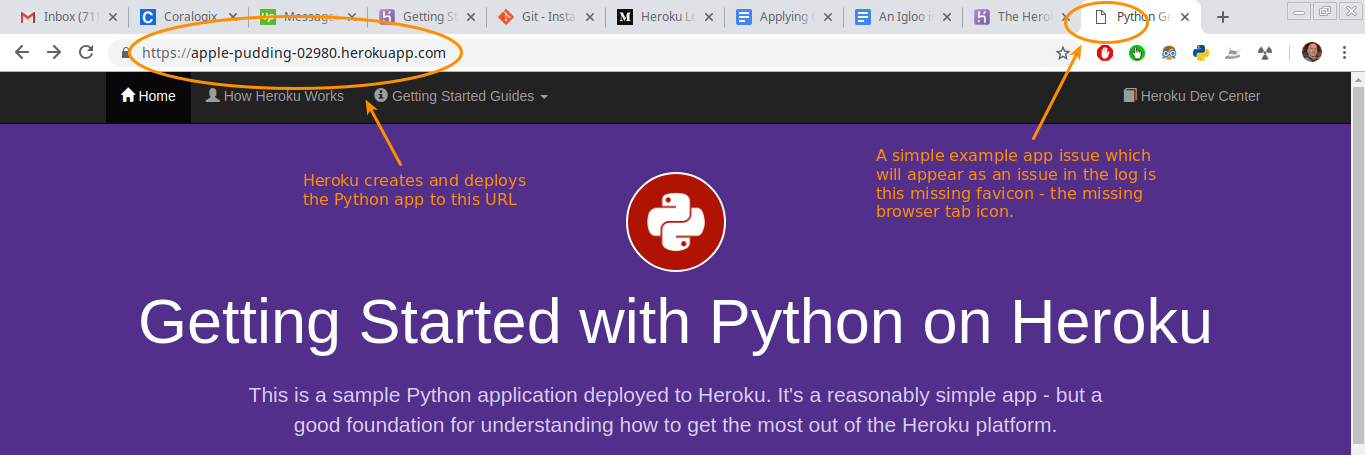
As you can see, Heroku generated a name and URL for this deployment, and the browser tab icon (favicon) which is missing instantly appears in the log:
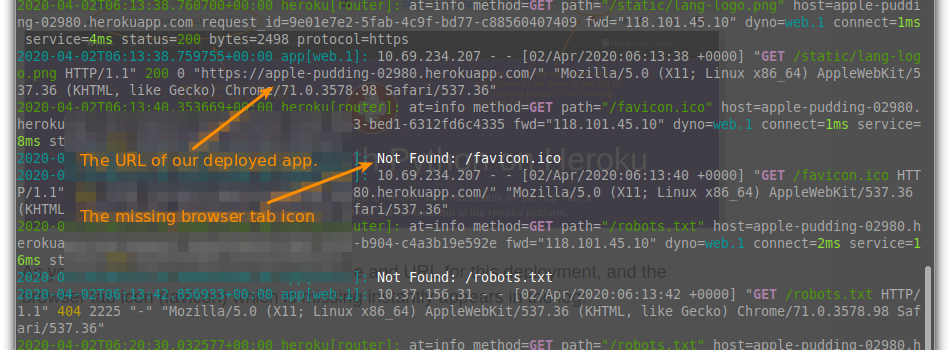
The volume of log output generated by deploying this simple Python app hints at the need for intelligent log monitoring and analytics. As we scale this simple app to reveal the more complex log output generated by Heroku during enterprise-level app development and deployment, the need for machine learning-capable analytics becomes imperative.
Avoiding a Common Issue with Heroku Logs
From this point on, developers can enter a natural CI/CD cycle of revising code and committing the changes to deployment, configuring a Drain with a logging app, and watching the dashboard for issues. However, for developers just starting out with Heroku, the next steps to deploy the code change from the local GIT repo may present two surprising problems. After making a code change to the local GIT, Heroku documentation offers these CLI instructions which should detect files that changed and deploy them to production, updating our app:
$ git add $ git commit -m "First code change" $ git push heroku master
The first problem, when using the CLI command $ git commit is a GIT message asking who you are. This is part of a first-time authentication setup:

Define your identity with the CLI commands suggested:
$ git config --global user.email "example@gmail.com" $ git config --global user.name "marko"
Now, with that done, when deploying the app with $ git push heroku master another potentially confusing authentication message occurs:
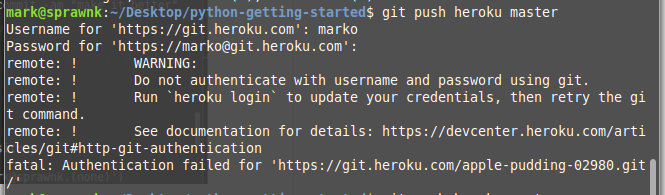
Notice that there is no mention of an API key in the dialog. As shown above, the "marko" id created previously is the correct username sought in this context. However, the "password" in this context is not the Heroku account password, but instead, the Heroku API key found on this page (you need to be signed in).
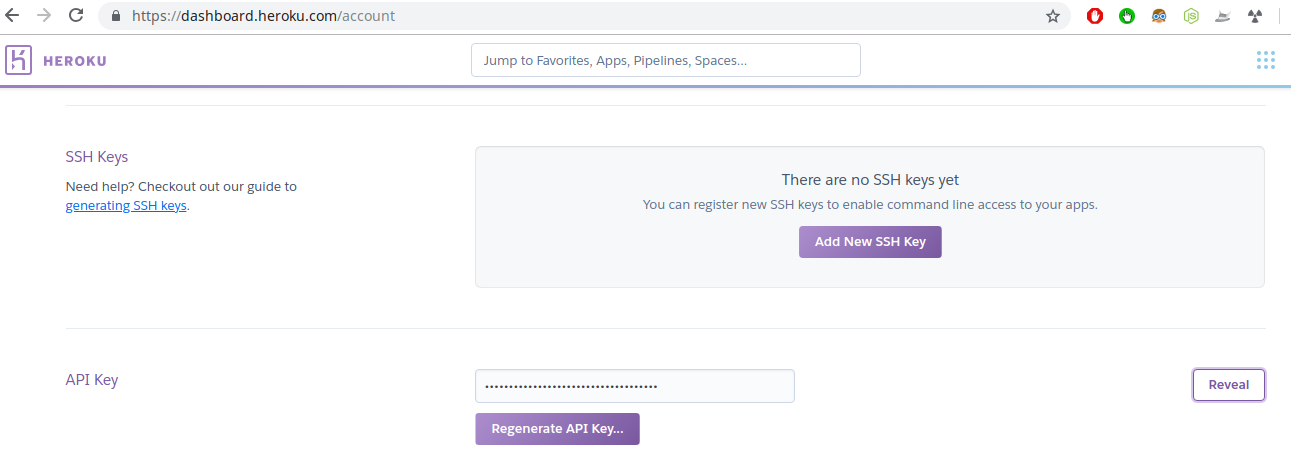
As shown in the next screenshot, the "password" is the API key.
Scroll down the account page and click the reveal button, and then copy and paste that key to the CLI in your terminal, depending on your setup:
At this point, with Heroku and GIT both authenticated correctly, the new changes can be deployed from the local GIT repo with this Heroku CLI command:
$ git push heroku master
From this point forward, code changes can be made and committed to deployment easily so that Heroku log streams flow from Logplex to designated endpoints. Now that we have this workflow in place, it's a simple matter with the Heroku platform to make code changes and commit them to deployment from the CLI.
Finding Memory Leaks with Heroku Log Monitoring
One common frustration for coders can occur due to the fact that, in spite of automatic garbage collection, memory leaks can appear in logs from applications running in production which seem to have no obvious origin. It can often be difficult for developers to find the cause in their code; it may seem logically correct, but we often need to look deeper for the cause. A few examples include:
- Loopback app in Node.js deployed to Heroku with a drain to New Relic. Running the app locally does not show increased memory use, but when the app is deployed to Heroku with New Relic, the heap steadily increases, even with no new requests.
- Subtle references to variables, such as closures. These still count as references to variables, and as a result, garbage collection will not release the memory. Various types of dependencies may likewise not be obvious when examining app code, but can also result in memory leaks which show up when the app is deployed.
- Mysterious Gateway Timeout entries appear in the log, but a memory leak was not detected in log analysis. For example, in a desperate attempt to discover the problem, a programmer is likely to wrap the code in Q-promises, examine heap sizes and MongoDB payloads, and explore many other avenues before discovering the memory leak in a data streaming method failure.
The common denominator in all these examples is that memory leak bugs may appear in your Heroku Logs and the developer may not recognize them in the app logic. These memory leaks can be extremely frustrating to troubleshoot and can lead coders to believe that the bug is actually in the V8 Heap, but more often, the bug lies in the app code itself.
Beginner Tip: Memory leaks occur when a program does not release unused memory. When undetected, memory leaks tend to accumulate and reduce app performance and can even cause failure. The "garbage collection" function of many compilers, especially Rust, is capable of adding code to compiled apps that discard unused memory. For example, in C++ this can prevent attacks on discarded pointers.
Heroku Logs For Faster Troubleshooting
As we've seen, Heroku Logplex generates voluminous log content that contains entries generated by every behavioral aspect of an application's deployment and runtime. Heroku logs are a vast resource for developers and members concerned with application performance and squashing bugs quickly.
However, logging has evolved far beyond debugging software and is now one of many focal points for the use of machine learning techniques to extract all the latent value in Heroku log data.
Software development in the context of enterprise CI/CD environments requires substantial automation to ensure high performance and reliable systems. Log management and analysis are critical areas of automation in software development. While Heroku logs are a vast source of data, Heroku log analysis add-ons like Coralogix are needed to extract the full value of your log data goldmine.
Technologies that remove logging inefficiencies, reduce data storage cost, and propel problem-solving with automation and machine learning will play a decisive role in determining your organization's ability to create business value faster.
Coralogix Add-On for Heroku
If you're looking for a powerful yet easy-to-use Heroku logging solution, look no further than Coralogix. A managed, scaled and compliant ELK stack powered by proprietary ML-techniques.
How To Change Which Heroku App I Want To Fetch Logs For
Source: https://coralogix.com/blog/heroku-logs-the-complete-guide/
Posted by: conklinlosetto.blogspot.com
0 Response to "How To Change Which Heroku App I Want To Fetch Logs For"
Post a Comment